A Inno Valley Works Product
Installation :
Enter the org details in which the application is to be installed with the given link
App Link :
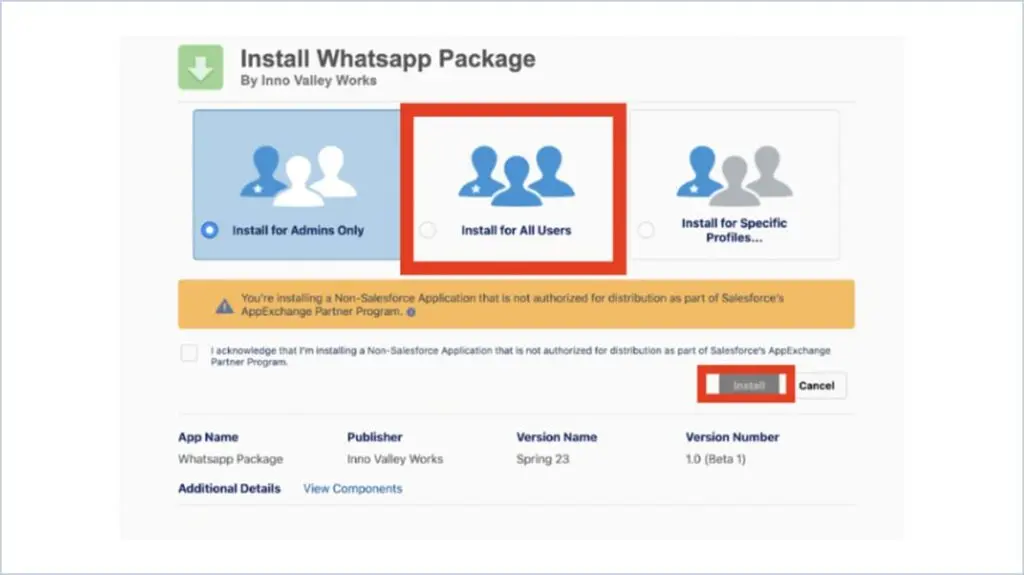
Choose Install for All Users and acknowledge by checking the checkbox
click Install Button
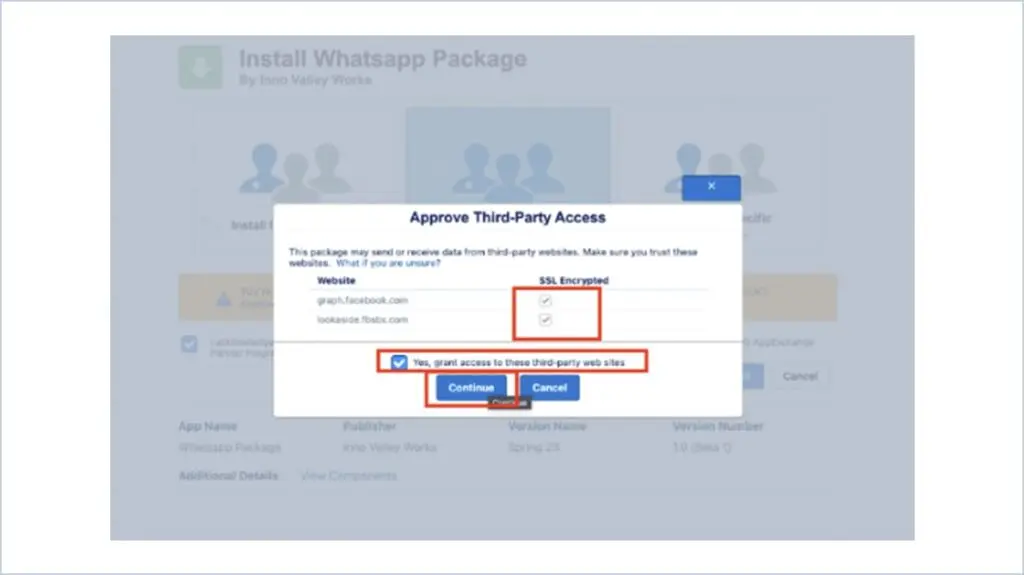
Check the check boxes below SSL Encrypted.
Check the access checkbox and click Continue
Once the installation is complete Click Done

1.Create Phone Code Prefix field and Whatsapp Opt out field in Respective custom object (Create Only for Pure Custom Object)
2. If Customer is using phone field with special characters Create a new Formula field like WA Formatted Phone
{ Formula : SUBSTITUTE (SUBSTITUTE (SUBSTITUTE (SUBSTITUTE (SUBSTITUTE (Phone, ‘(‘, ”), ‘)’, ”), ‘-‘, ”), ‘+’, ”), ‘ ‘, ”) }
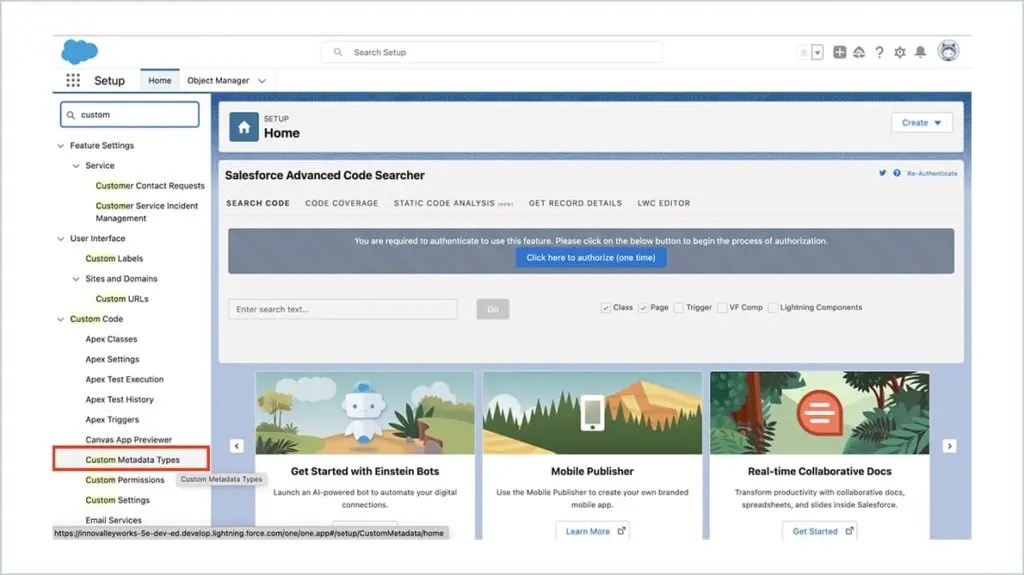
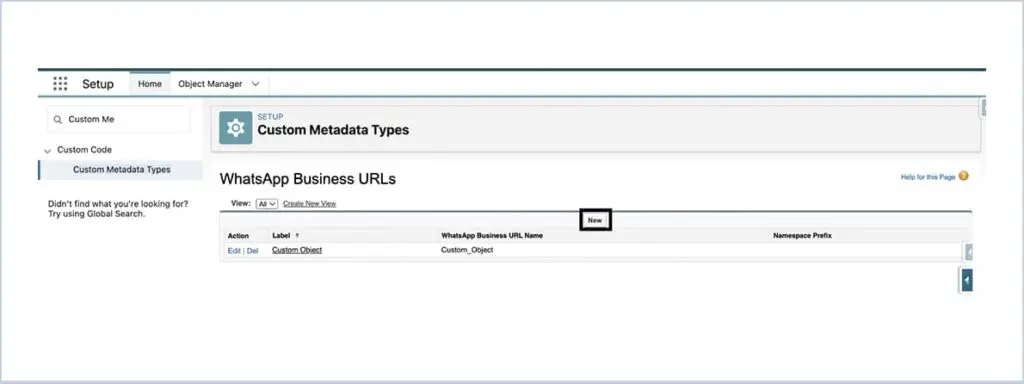
Creating Records in Custom Meta Data :
Go to Setup. Search Custom Metadata Types in Quick Find Box and click on that
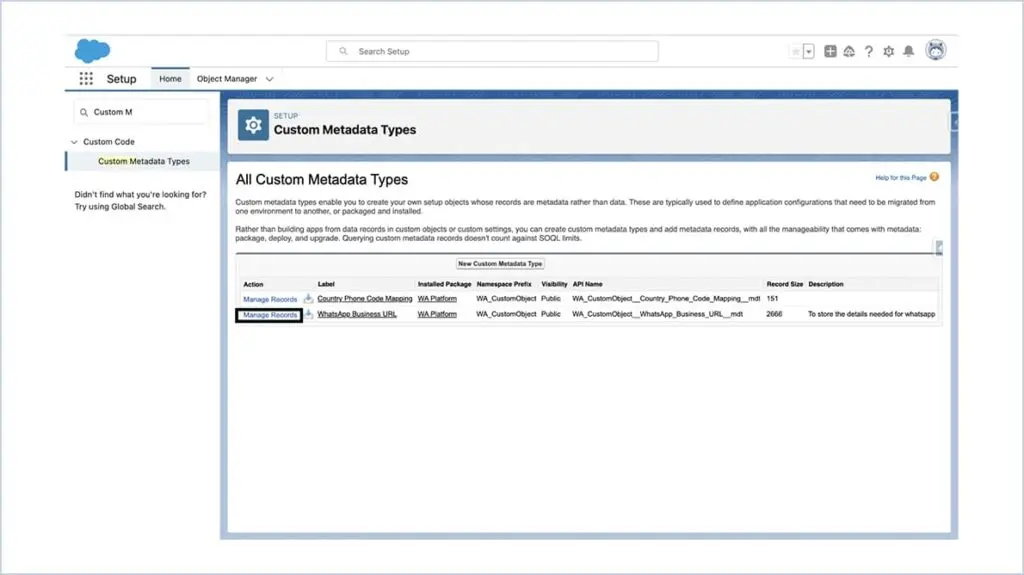
Click on Manage Records near Country Phone Code Mapping
Click New Button
Label – Enter the Country Name
Phone Prefix – Phone code prefix of respective country
Click Save

Click on Manage Records near WhatsApp Business URL
Click New button
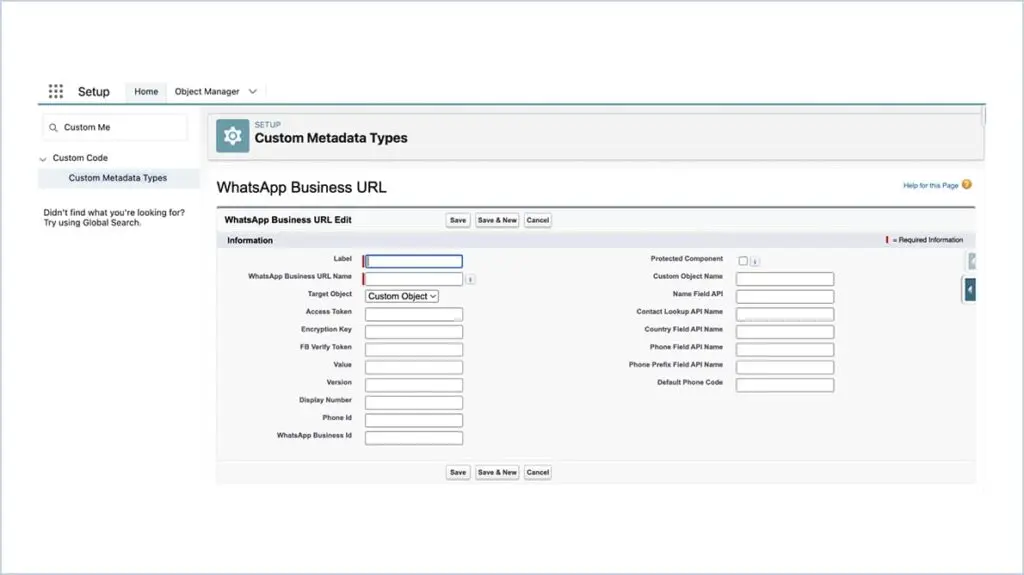
WhatsApp for Custom Object With Contact Lookup :
(If you are placing the component in Custom Object with Contact lookup)
- Label – Custom Object
- WhatsApp Business URL Name – Gets pre populated automatically
- Access Token – Permanent access token generated from Meta
- Encryption Key – ****************
- FB Verify Token – Token used while verifying Webhook
- Phone Id – Phone Number Id From Meta
- Value – graph.facebook.com
- Version – v15.0
- WhatsApp Business Id – WhatsApp Business Account Id from Meta
- Phone Code – +1(For US Phone Numbers)
- Target Object – Choose the Target Object as Custom Object
- Display Number – From Number in Meta
- Custom Object Name – Enter the Custom Object Name API
- Name Field API – API of Name field of Custom Object / Contact
- Contact Lookup API Name – API of Contact Lookup in Custom Object
- Country Field API Name – MailingCountry
- Phone Field API Name – API Name phone field
- Phone Prefix Field API Name – WA_CustomObject__Phone_Code_Prefix__c
- Default Phone Code – Enter the Default Phone code of your country
- Formatted Phone Field – If Customer is using phone field with special characters then enter the API Name of Created Formatted Phone Field or use Phone field
- OwnerId – Enter the user id to assign the owner for new records (OPTIONAL)
WhatsApp for Custom Object Without Contact Lookup :
(If you are placing the component in Custom Object without Contact lookup)
- Label – Custom Object
- WhatsApp Business URL Name – Gets pre populated automatically
- Access Token – Permanent access token generated from Meta
- Encryption Key – ****************
- FB Verify Token – Token used while verifying Webhook
- Phone Id – Phone Number Id From Meta
- Value – graph.facebook.com
- Version – v15.0
- WhatsApp Business Id – WhatsApp Business Account Id from Meta
- Phone Code – +1(For US Phone Numbers)
- Target Object – Choose the Target Object as Custom Object
- Display Number – From Number in Meta
- Custom Object Name – Enter the Custom Object Name API
- Name Field API – API of Name field of Custom Object
- Contact Lookup API Name – Blank
- Country Field API Name – Country Field API Name
- Phone Field API Name – API Name phone field
- Phone Prefix Field API Name – WA_CustomObject__Phone_Code_Prefix__c
- Default Phone Code – Enter the Default Phone code of your country
- Formatted Phone Field – If Customer is using phone field with special characters then enter the API Name of Created Formatted Phone Field or use Phone field
- OwnerId – Enter the user id to assign the owner for new records (OPTIONAL)
Click Save Button
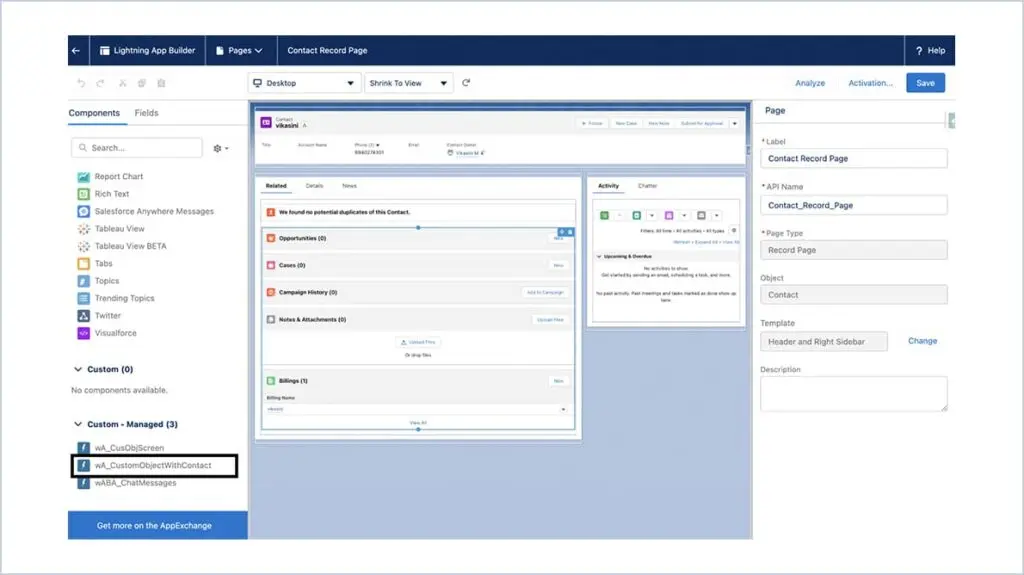
Component Placement :
Contact Page / Custom Object :
Go to Contacts tab
Select a Contact Record and give edit page
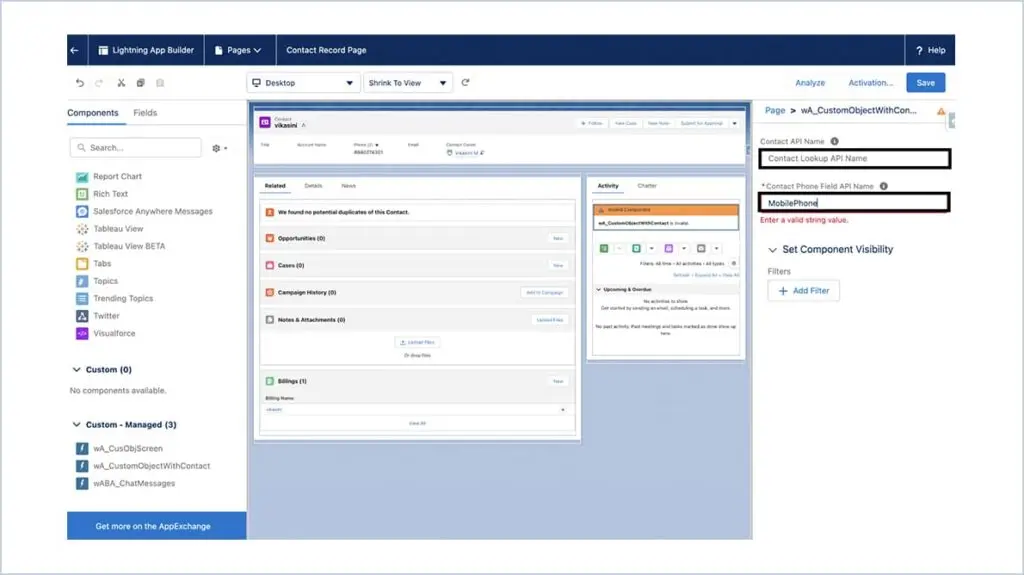
Drag & drop the wA_CustomObjectWithContact from components to the page
Contact API Name – Enter Contact Lookup Api name if component is placed in Custom object record page otherwise leave it as blank
Contact Phone Field API Name – Enter the API Name of corresponding phone field
Click Save
Custom Object Without Contact :
Go to respective Custom Object page
Select the record and give edit page
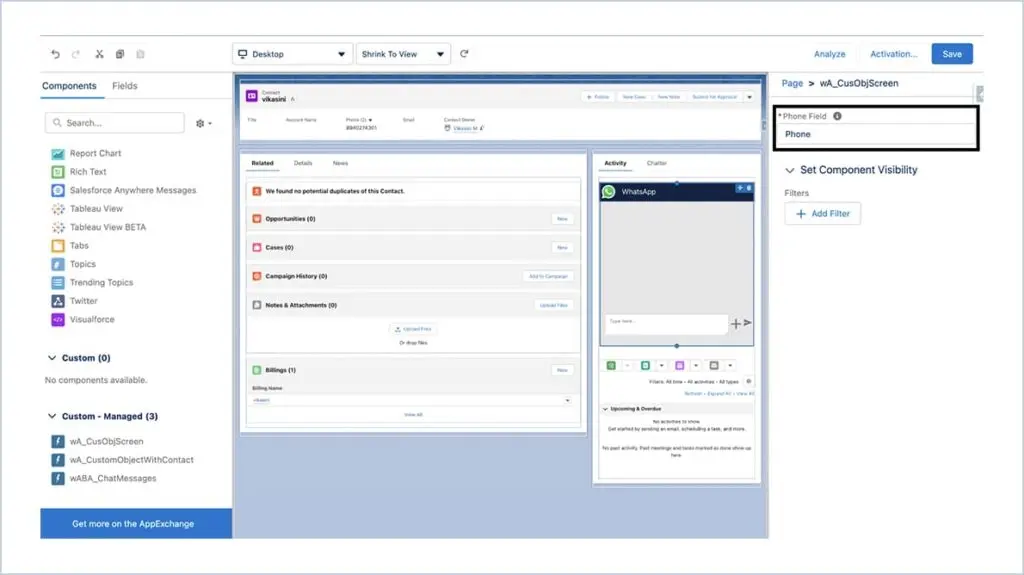
Drag & drop the wA_CusObjScreen from components to the page and click Save
Phone Field – Enter the API Name of Respective Phone Field
Sending Bulk Messages :
Respective Custom Object → Buttons, Links, Actions → New Button or Link
Label – Button Label
Display Type – List button
Content Source – URL
URL – /flow/WA_CustomObject/Send_Bulk_Messages?retURL=<URL OF Custom Object List View>
Click Save

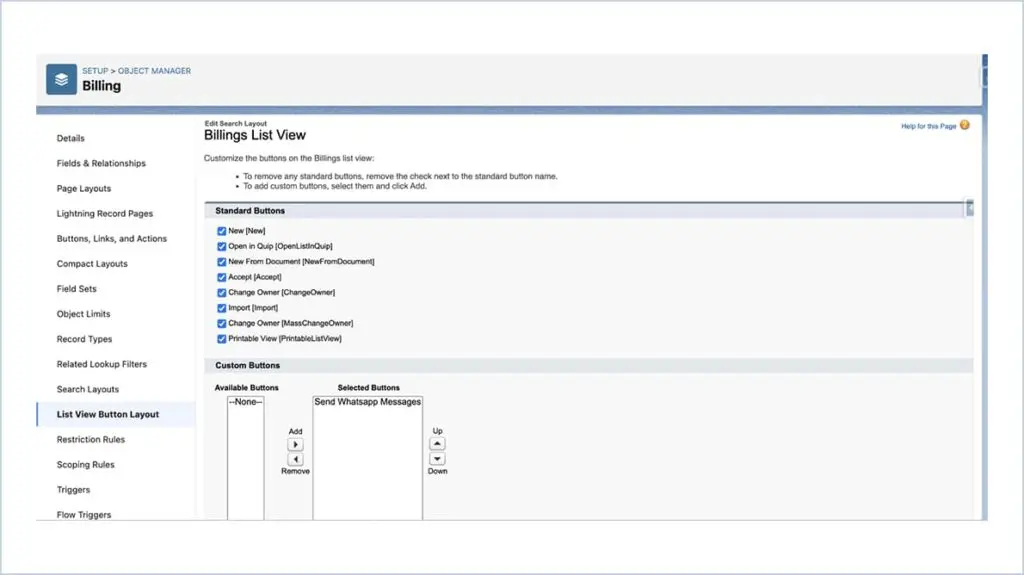
Respective Custom Object → List View Button Layout
Edit the list view and add the Recently created button
Click Save
Go to respective Custom Object List View
Select the records and Click Send Whatsapp Messages button
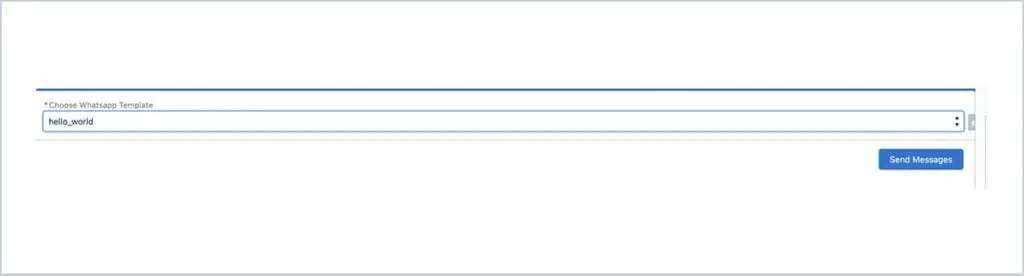
Choose the WA Template and Click Send Messages button
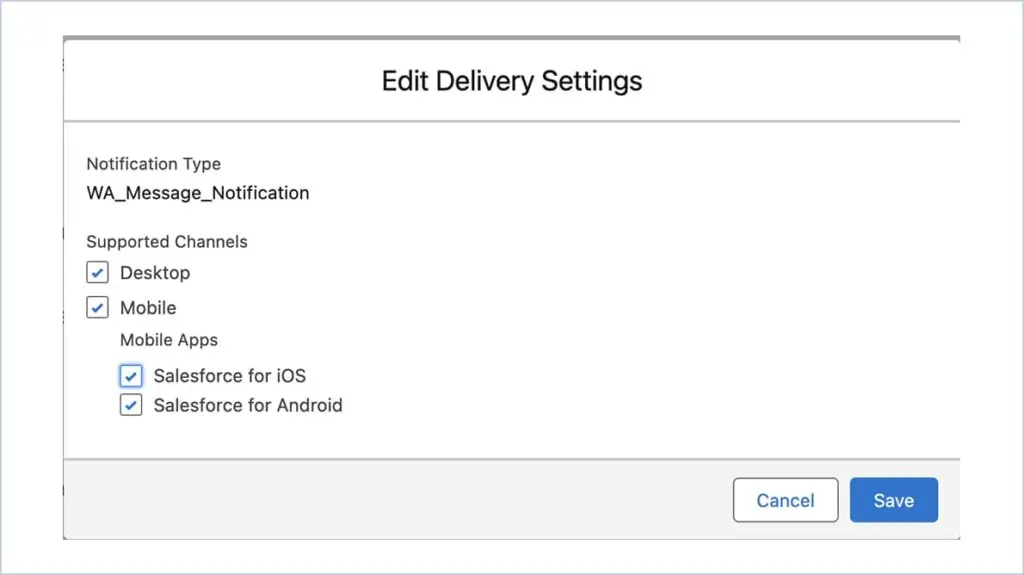
Mobile Notification :
To Get Notification for inbound messages. Goto setup → Notification Delivery Settings
Click the down arrow and choose Edit button
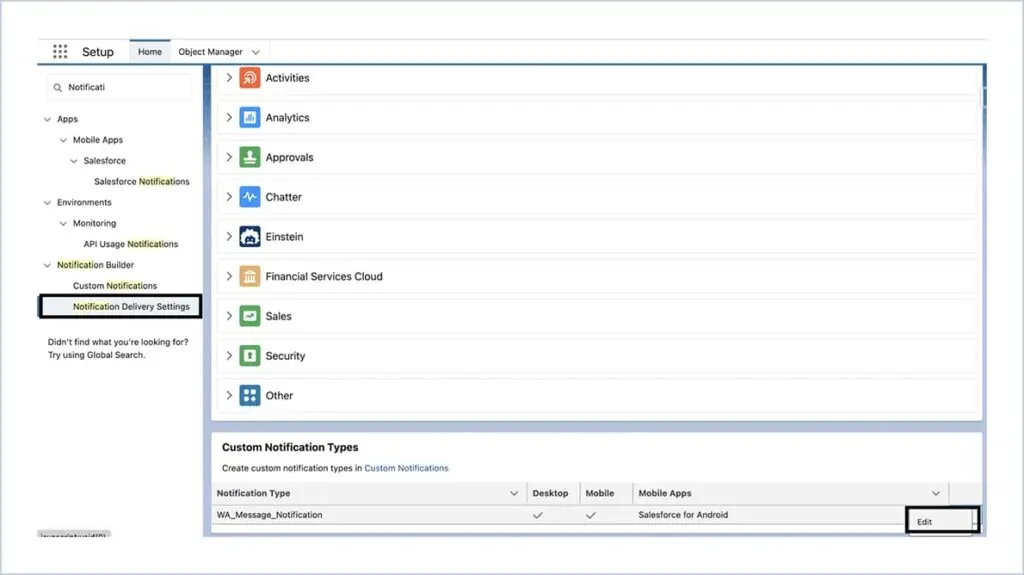
Choose Salesforce for iOS and Salesforce for Android Checkbox and Click Save
Frequently Asked Questions
Is Watbox GDPR compliant?
WatboxApp, which uses WhatsApp with Salesforce, is fully GDPR compliant. Here's how we ensure data protection and privacy :
Secure Data Handling : All customer data is encrypted during transmission and storage between WhatsApp and Salesforce. There is no third party involved in the data storage. Only your salesforce system will have the customer data.
User Consent : We obtain explicit consent from users when they interact with us via WhatsApp and also the customer data with the consent you already have can be used for WhatsApp communication.
Data Minimization : We collect only the necessary personal data required for customer service purposes. Strict access controls are in place within Salesforce. Only authorized personnel with the necessary permissions can access personal data.
Opt-Out/Unsubscribe : Customers can opt out or unsubscribe from WhatsApp Communication anytime by responding or clicking the opt-out buttons.
How does WatBox connect to Sales in Salesforce?
When a customer interacts through WhatsApp, scanning a QR code or initiating a chat from a platform like Facebook, WatBox forwards the message and phone number to Salesforce. If the phone number is new, WatBox creates a Person Account, Contact, or Lead. If the number already exists, the message is added to the appropriate record.
Can WatBox messages be tagged to any Salesforce objects?
Yes, WatBox allows configuration for tagging inbound or outbound messages to any specific Salesforce objects.
Level up WhatsApp Integration with Salesforce
Start with a 30 day trial for you to taste the CRM + WhatsApp interactions!